- BEAD SCHOOL -
Free online jewellery making help & instructions.
Learn how to make your own jewellery. Free projects and designs. Beads, beading and jewellery making.
You will need a selection of beads, headpins, jumprings and a trigger clasp or similar.
Wire all your beads and then join pairs of beads with jumprings. I give instructions on how to make wrapped loops in this post. You could also use Wubbers Looping Pliers, which I reviewed in this post.
Assemble the pairs of beads using more jumprings. Add the clasp at one end.
Add a new pair with another jumpring, making sure that you have one bead either side of the new pair.
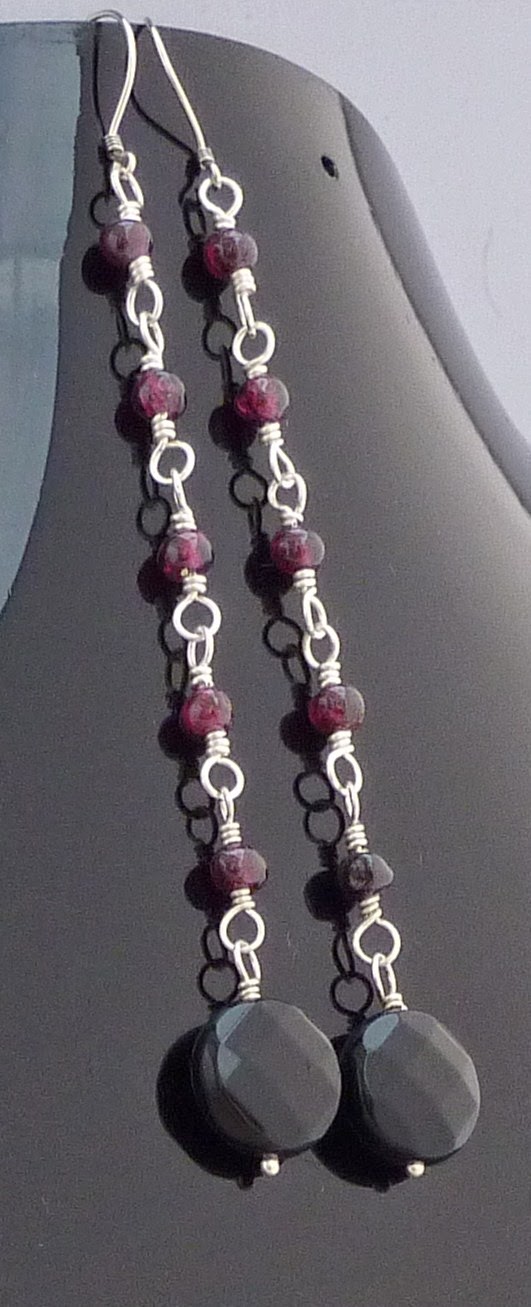
I make a lot of rosary style jewellery and I like to wire wrap every link for extra security. I have been making this kind of jewellery for 25 years and am pretty good at getting even loops with ordinary round nosed pliers but my Wubbers Looping Pliers changed my life. Well, maybe not my life, but my jewellery making.
This freshwater pearl charm bracelet was made using my Wubbers Looping Pliers and 0.6mm sterling headpins.
I bought my Wubbers about 2 years ago and I use them for just about every piece of jewellery I make. I certainly use them for every standard loop and wrapped loop connection I make and here is why;
Uniform loops are crucial for
earrings to be the same length.
Wubbers have a nice long handle with a comfort grip and they are very comfortable to hold and to use.
They are specially designed to make loops that are a uniform size (2.2mm). Round nose pliers are tapered from the base to the tip of the pliers, which can be handy for making different sized loops. But if you are making a lot of loops and want them all the same size it can be difficult to achieve this with round nose pliers, even if you mark your working point with a marker pen.
Wubbers make loop making very quick. Just put the wire in and squeeze, or wrap. You can adjust the position of your loop just as you would with round nose pliers.
You can make ordinary loops or wrapped loops.
They can accommodate different gauges of wire. Wubbers are designed primarily for 0.8mm (20gauge) wire but can handle 1mm and 0.6mm wire. Most of my sterling silver jewellery is made with 0.6mm wire using my Wubbers Looping Pliers. The Wubbers do not grip the 0.6mm as well as they do 0.8mm but as long as I hold the wire correctly the pliers work fine with it.
Close-up of Wubbers Looping Pliers.
Wubbers Looping Pliers do not mark the wire like round nosed pliers can. I use a lot of sterling silver wire and it is softer than copper and marks more easily. With round nosed pliers you have to grip your wire between the two "noses" of the pliers but Wubbers Looping Pliers have a round bar and a channel for your wire to sit in. This channel part of the pliers are what help the wire to bend around the bar.
Wubbers are an American company but the looping pliers are available in the UK. They come with an instructional mini cd which you can play on your computer.
They are available at Amazon -
My Wubbers are easily my favourite tool and the only tool I use more than my Looping Pliers are my flush cutters. They aren't expensive at approximately £20, they are definitely worth the investment.
Perfect wrapped loops in my garnet & oxidized
sterling silver rosary style necklace.
Here a couple of videos of some of my handmade gemstone jewellery being shown on a UK tv channel.
My handmade copper and labradorite necklace.
My handmade copper, citrine, aquamarine, rose quartz & prehnite necklace.
I have bought several strands of gemstone beads from www.jewellerymaker.com who have a UK shopping channel (Sky 655). They have a weekly prize draw (number out of a hat) with 2 prizes on offer - £100 or £50 credited to your account with them. To entry you just send a picture of something you have made using something that you have bought from them. It could be just 1 bead in a whole necklace or just the wire, as long as something in the piece came from them. Some entries are picked to be read out on live television and this is repeated upto 5 times a day. They read out your message and your name as well, which is great for advertizing purposes. They also say some very nice things about your jewellery, which is always a boost.
I have had about 6 items read out on TV, I enter about once a month, if I remember. I also try to save the clips and post them to youtube but I have missed several of them. It was actually the comment I received on this show that gave me the kick up the bum I needed to take my jewellery seriously and set up my business properly.
If you need a confidence boost (or a kick up the bum) take a look at the show, suss out the format and enter a piece of your jewellery. Don't forget to look out for it on the show for a few days afterwards, it would be a shame if you missed your big moment.
It has been a while (years) since I posted on this much neglected blog. I have been very busy. My family has grown and I have started a new website www.abigailfranklyn.com for my handmade jewellery.
I thought some of you might like some tips on how to sell your jewellery.
I have been making and selling jewellery since 1989 and this year (2013) alone I have set up 3 online shops with an inventory of over 100 items of jewellery & made several sales.
Through the years I have learned how to take good photos and how to use other sites to promote my jewellery and how to find outlets and craft fairs to sell to the public. I even have people calling me to ask me to sell at their fairs. I have also learned how to get organised for shows and display my jewellery, plus the all important pricing.
I have had a few disasters along the way, like my first craft fair, that was cancelled with just 1 week to go! I had been planning it for 4 months and driving my family crazy. It was going to be my big launch and that cancellation took the wind out of my sales. I moped for 3 days. A week later I had booked 3 more fairs, determined that I would not give up.
I will be going into more detail with future posts but here are a few quick tips;
1. Always make sure that your jewellery is well made. That sound obvious but this is a biggy. Make sure that you have tucked all your wire in neatly, trimmed your threads, firmly secured crimps and jump rings. I like to wrap all of my wired connections because unwrapped loops can open if pulled. I also file my wire ends if I am using 0.6mm or above and I make sure that the ends are neatly tucked in. Check for any scratchy bits. Make sure that the thread you used is up for the job, strong and not previously used on something else. I am all for recycling but never for wire or thread. If you are using chain, check that it will stand up to gentle tugging, some chains are weak and sometimes links are not closed properly. Close all jumprings so that they are flushly lined up. Do not used damaged beads. Nothing is unbreakable but if you do all that you can to make sure your product is good then it won't come back to bite you.
2. Daylight is best for photography. I never use a flash when taking photos, I like to take my photos in daylight, with a fold up light box (which I use more to hide my surroundings than anything else). I will either go outside if it is a nice day or use my conservatory (a greenhouse is also good). I have tried using bits of driftwood, shells and pottery but my favourite props are ordinary necklace busts or earring stands and a plain white background. It is easier to brighten up a picture with a white background if you have software with a white balance button. I use a basic Microsoft program that came with my laptop.
3. Don't rely on Etsy or Folksy as your main outlet. I love that these sites are so cheap and easy to use but the big problem with them is that everyone else loves that too. There is just too much competition and you will find that its hard to make sales on there unless you have some sort of following or status. I have seen some jewellery makers who sell 5 or more items a day at $30+ per item, a very good living, but they have created their own brand and this takes time and a lot of work that doesn't include making the jewellery. I have sold on Etsy and have an Etsy shop but I also have a separate online store with my own URL www.abigailfranklyn.com
4. Decide on your style. This is hard for me, I hate being constrained, so I ignore this rule from time to time and make what I want. However, I decided that my online shop and my tables at craft fairs would only have gemstone jewellery on them. I have a spare Etsy shop for my glass jewellery. I also decided that I would give free gift boxes and free UK postage with every purchase of gemstone jewellery. You can have multiple jewellery making personalities but you may want to keep them separate.
5. Keep up to date on prices. We jewellery makers tend to have stashes of beads and findings. When pricing your jewellery (which I will go into more detail on later) don't forget inflation. Beads don't have a sell by date so if you decide to use that lovely gold lined venetian bead that you have had since 1992, remember to allow for the cost of replacing it today, not what it cost you back then. Other wise your business will not be sustainable (without a time machine) and you won't be able to buy more beads. Oh, the horror!
You will need; Beading thread Beading needle Seed beads - 3 colours of size 8/0, 2 colours of size 11/0 & 1 size 15/0. 6mm Round Bead Jump Ring
This motif is worked from the centre.
1. Thread your needle and thread on 12 seed beads (A). Go through the first seed bead again to make a ring. Secure this ring shape by passing your needle and thread through the ring once more.
2. Add your 6mm bead to the centre of your ring by threading it on and then passing your needle through the seed bead at the opposite side of the ring of seed beads. Pass your thread through 3 more seed beads.
3. Commence herringbone stitch by adding 2 seed beads (B) and then passing your needle through the next 2 beads in the ring. Continue adding beads in this way until you have added 6 pairs of seed bead (B).
Reposition your thread so that it emerges from a (B).
4. Repeat step 3 with seed beads (C), (D), and then (E), following the same thread path through the centre ring and repositioning the thread to the top of the next stack each time. Ensure that the new rows of beads do not twist. The pairs of beads added should begin to lie side by side as you continue to add rows.
5. Bring the thread through a bead at the top of one of the stacks of beads and add 1 seed bead (F). Pass the needle down through the next bead in the same stack, and the 2 seed beads below it. Add 1 x (F), 1 x (A) and 1 x (F) then pass your needle UP through the corresponding beads on the next stack. Continue with this step until all six stacks are complete.
6. Reposition your thread so that it emerges from an (F) at the top of the nearest stack. Add 7 more (F)’s and go back through the one at the top of stack to create a small ring of seed beads. Pass your needle and thread through this ring again to secure it and then secure your thread by passing it through several beads in your pendant. When the thread feels secure enough you can cut it. Add the jump ring and attach your pendant/charm to a chain, keyring, ribbon or handbag.


